Sunday, February 28, 2010

Cleaning Day

Ugh. I've had so much fun with my blog for the last 5 weeks or so that cleaning has taken a back seat. I now have dog and cat hair tumbleweeds tumbling along the hardwood floors. I keep the place tidy, because I can't stand when things are out of place. But I hate when I let it get dirty. It's so much harder to clean it than if I just kept on top of it every couple days (just to clarify -- its not like I haven't cleaned AT ALL in 5 weeks, just not as much as usual). So, I'm dressed in my comfy cleaning clothes, have my supplies handy (I think I'm going to have to go the chemical route instead of natural cleaners in the bath and kitchen), have some candles lit (just because I like to) and will be putting on some rockin' tunes to keep me moving and motivated.

My favorite cleaning tip would be to hire someone else to do it. Alas, it can't be so. What are some of your favorite tips?


Saturday, February 27, 2010

Haiku Saturday

I have a new weekly blog post! Haiku Saturday will be a regular feature here at Black Kat's Design. I love Haiku (Japanese poetry). It's fun to try to convey an image or meaning, often with a nature reference, in just 17 non-rhyming syllables. These are my original poems. I hope you enjoy them.


The snow falls silent
I want to feather my nest
Spring will soon be here


Friday, February 26, 2010

Fab Friday Favorites

Below are some of my favorite items from around the blogosphere. I hope you find them as creative as I do. Be sure to check out these inspiring sites and leave a note that you were there!


This clothesline wreath is from Maggie at Smashed Peas and Carrots. Here the green fabric is used for St. Patrick's Day, but it can be changed out for whatever holiday or season you like. I love the modern and clean lines yet natural feel of the wreath. I can definitely see this hanging year round on my front door.


I see so many projects for different types of bulletin boards. This craft is so needed. Fabric covered thumb tacks! Yet another reason for me to work on a bulletin board project. What fun you could have with fabric on this one. This is from How About Orange. The tutorial looks so easy, give it a try.


This project has my heart going pitter-patter. I'm a big texture lover and Angie at the Country Chic Cottage makes the burlap shiny in places! I love shiny almost as I love texture. I don't have room for any more pillows, but I'm eying this technique for my living room curtain project


OMG is this so cute. Kalleen over At Second Street made this great wallet from clothing tags. I've never thought to save the tags. I collect silk ties and wool cloths to felt and upcycle and just throw the tags away. Well you can bet my ways have changed! The tutorial has so much detail and makes this project look very do-able. Doesn't the pops of green make this wallet look even more fantastic?


I'm not one for cottage and shabby chic projects. However this one tugged at my heart strings. How I wish I had my son's baby shoes left. I'd make this project but I'd use some modern, geometric fabric and have it sit by my sewing machine. (Maybe I can find a pair of baby shoes at the thrift store and just fake it?). This adorable one is from Barbara Jean at Treasures from the Heart.


I feel so uncreative when I see projects like this. How do people think of these things? These are gorgeous beads made from paper done by the folks over at A Storybook Life. Take a look at them, they also have a necklace made from the paper beads, felt beads and washers. It is totally Fab. Anybody want to try out this project and make me a necklace?


I Love, Love this art made from smushed toilet paper tubes. I thought I was going to make it for someplace (I didn't know where I would put it) and started saving tubes. Well I got frustrated with myself and decided this is just one more of those projects that I love but will never actually get around to making, so I recycled all the tubes. Now I'm back to saving tubes because I thought of the perfect place for a large toilet paper tube art installation. This project is from Tali at Growing Up Creative.


I'm so making these waffle texture monogrammed towels. Just as soon as I finish the other 900 bagillion things I love and want to make. For this one I would have to figure out how to get the monogram on them without a special sewing machine. Maybe stencil? Cut the monogram out of fabric and applique? Any other ideas? These thrifty monogrammed towels are from Susie of Susie Harris.

Well that wraps up some of the fabulous projects I had bookmarked from the last week. Since Fab Friday Favorites will be a permanent feature here at Black Kat's Design I'll have more projects for you next week.

Hope you have a great weekend and don't forget to check back tomorrow for Haiku Saturday!


Thursday, February 25, 2010

Quick Declutter Tips From Unclutterer


Everyone is busy and sometimes decluttering falls to the bottom of a long list of chores to do. In fact I've heard that there is a rare breed of people out there who don't like to organize and declutter?!

Having a clutter-filled home can be overwhelming and exhausting. It can cause stress, anxiety and reduce productivity. Clutter can seriously cut into decorating and crafting time. It's hard to accessorize when you can't see the table tops. And glue guns are dangerous when used in the wilds of a messy dining room table. When left undone little problems quickly become big problems. Soon enough it's easier to just do nothing. Then you show up on A&E's the Hoarders (kidding).

I came across this article on the fun and interesting website, Unclutterer on 10 tips to beat clutter in less than five minutes. It was written by Gretchen Rubin. Check out my favorites, but don't forget to visit their website to see all 10 tips!

Make your bed each morning. (Why is this so difficult for me to do?!)

Follow the “one-minute rule” – push yourself to do any chore that takes less than one minute. Throw away the junk mail, close the cabinet door, put your dirty socks in the hamper, hang up your wet towel. (Also, you can work just during commercial breaks on TV. It's amazing how much you can get done).

Pause for a moment before you “store” something. Storing something means you don’t intend to use it much. Other than holiday decorations and seasonal clothes, you should strive to “store” as little as possible. (This is an easy one for me as I have about zero storage space in my small condo).

Identify an organization or person to whom you can give things you no longer need – it’s much easier to get rid of unneeded stuff if you can envision someone else getting good use from them. Also, figure out a place to store those things until you hand them over. (I love Freecycle. It's so personal and friendly. Otherwise my items go into a bag behind my bedroom door and get donated on my next trip to the thrift store).

Hang up your coat. (Yes, Mother).

Before you go to bed, take five minutes to do an “evening tidy-up.” Don’t tackle anything ambitious, but just stack up the magazines, put your shoes away, shove the chairs into place, etc. Just a few minutes of tidying can make your house look a lot better, and it’s a calming thing to do before going to sleep. Plus it makes the morning nicer. (For me this makes all the difference in the world!)

What's your favorite decluttering tip?

Wednesday, February 24, 2010

It's Craft Time! Sisal Rope Wrapped Vase


Pretty isn't it?! I love the juxtaposition of color, texture and roughness against the bright and delicate flowers.

I've been watching the "twineifying" (can't take credit for the new word) of objects in decorating blogland and decided to get in on the action. Since I'm a more bang for her buck type of gal, I wanted something more substantial than twine. I love texture and chunky sisal rope was just perfect for me. Even better I had some laying around from a noose my son used during a photo shoot  (it's not as gruesome as it sounds).


So supplies were $1 vase from my new most favorite place The Dollar Store (Yes, it's true. Target Clearance End Caps you have been replaced in my heart) sisal rope on hand, and my trusty glue gun always at the ready. Did you catch that? The entire vase project cost me $1. Excuse the messy craft, er dining room table. I still have supplies from the glass stone frame laying about (lying about? Mrs. Whitson, my 5th grade English teacher would be appalled that I can't remember which is correct).

It was easy-peasy. Put a big old dab of hot glue at the bottom of the vase (not the bottom bottom, just the side bottom). Stick in the end of the rope and hold until it sticks (burn fingers in the process). Wrap the rope tightly around the vase, gluing every now and then, but at least once each turn around. Make sure to push the rope down so there aren't gaps. Wrap, glue, wrap, glue, wrap, glue, burn fingers, wrap, glue. You get the picture. Go all the way to the top, cut the rope and glue the end down. It worked out just right so my top and bottom start and end points lined up so my vase has a back side. See, I told you it was easy. BTW, the sisal rope sheds more than my dog so prepare to vacuum after making this.


What do you want to wrap in rope? That sounds kinda bad doesn't it? How about what do you want to twineify?

Don't forget to check out all the link parties listed on the right lower side of my blog!


Tuesday, February 23, 2010

How to read a Decorating Magazine

Techniques to get the most out of decorating photos *


Decorating magazines (and catalogs) offer a terrific source for decorating ideas. However, it can be overwhelming to see hundreds of "perfect" rooms and photographs in each issue.

So instead of feeling inundated with ideas and projects, try some of these techniques for looking at magazine photographs. Some of these are designed to help you zero in on your personal preferences and style, while others will teach you, train your eye, and give insight into decorating principles. Rather than just browsing a magazine, this is looking with a purpose. It's not just paging through a publication, it's sitting down with an assignment. By consciously deciding what you want to learn, you can focus on a particular topic and teach yourself more about design. Next time you're looking at a magazine, pick one or two of these techniques and see how much you'll learn!

Choose one photo of an interesting room and quickly write down all of the descriptive words you can think of to describe the room such as: open, white woodwork, traditional style, light fabrics, no green plants, fresh flowers, chandelier, inviting, floor to ceiling drapes, symmetrical art, plain ceiling. Write down as many as you can in 1 minute. If you can't think of very many words, then try reading the article about the room to see how the writer describes it, and what looks the designer intended to create. Add to your list of words as you're reading, and study the photograph to see how each word applies to the room. This exercise will help you look deeper into photographs, showing you the elements of each room.


As you page through a decorating magazine (or book), look only for one focus item. It might be color one day, and window treatments another. Every time you see that element in a photograph, take a few minutes to study the picture. Do you like this version? Is it "you"? How is it used within the room, what does it coordinate with, and how might you adapt it to your space? Tear out photos you like, as well as photos you dislike. Mark each page with arrows and notes ("love valances, but hate the green") and keep your "likes" and "dislikes" in separate folders. Purpose? To give you a range of creative options and help build a "Style File" of things you love. (we'll talk about a style file later on)


Here are some of the ways to focus on color and style in a photograph.... Ignore furnishings and style and look only at color. Squint if you have to, in order to "unsee" a particular sofa style or chair design. Imagine standing in the room. Do the colors make you feel happy, blah, exhilarated, calm? Are they bright, airy, boring, oppressive, fresh, lively, or too much? You'll begin to learn how color affects you and which colors you might want to live with full time.

Read with an eye for color palettes. Study a photograph and if you can, glue or tape it to a piece of plain white paper. Decide on the primary, secondary and accent colors. Write them down. Then look on a color wheel to determine the type of color scheme (monochromatic, complimentary, etc.). Look through your collection of paint chips, finding the colors that match and gluing them to the paper as well. Doing this exercise will help you focus on color and become more adept at matching color.


Test yourself on style. For each picture, decide if it is casual or formal, country or eclectic. If you know a little about period style you might pick out a Chippendale chair, a Neo-Classic detail, or an Asian style table. For any style you are particularly drawn to, read the text to learn more about it. For a true style overview you'll probably need to take a class or read books, but there is much you can do to begin seeing the elements of style.

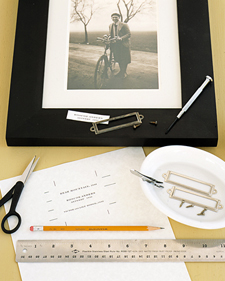
Art and accessories can also be studied in photographs. Watch for arranging tips, grouping ideas, height, spacing, and placement. Behind a sofa, how have the pictures been arranged? Does the arrangement extend to the outer edges of the sofa? How high have pictures been hung? Look too for the overall shapes of groups of objects. For example, a lamp, plant, and dish placed on a table may form a large triangle. Also look at how the designer has used objects of different sizes in arrangements. Use this exercise to see the bigger picture as well as the details in art and accessories. Note how and why each piece has been chosen and placed, and you'll begin to understand accessorizing in a new way.


* I thought this article had such great information I wanted to share with you. My BFF and I were talking just last night about reading decorating books and trying to pick out details. The article is from Glenna Morton at About.com. The photos are my addition. 


Monday, February 22, 2010

In the Kitchen - Baked Oatmeal


My son always asks for this. It's an easy breakfast favorite (or late night snack). I like to double the recipe and make some in muffin cups to freeze for individual servings later.

1/2 C vegetable oil (or use half applesauce and half oil)
1/2 C sugar
1 Egg
3 C oatmeal
3/4 T baking powder
1/2 tsp salt
1 1/4 C low fat milk

Beat the oil and sugar together than add the egg and mix. Add the remaining ingredients. The batter should have the consistency of a runny cake batter. Pour into a 9x9 greased pan. Bake at 350 degrees for half an hour or until firm and golden brown. Top with raisins or brown sugar.

Yummy!


Saturday, February 20, 2010

Weekend

I hope you all are having a great weekend. I'm busy putting the finishing touches on the new blog design and layout. I'm excited about the new look! I hope you will be too.


Friday, February 19, 2010

Updates Ahead

I've been blogging for just a month now. I've been making minor tweaks to my layout at night, you might not even have noticed them. I know it seems too soon for any major updates, but I'm just not happy with the general look of the blog. It's so cute, just not really me.

I've received some nice feedback from people who really like the site and especially the damask background.  And goodness knows pink is my favorite color. The title piece looked so pretty when I was featured on Finesse Your Nest. And I feel badly changing it so soon after the feature.
 
However, after using it for a little bit the layout feels like it reflects the old me of a few years ago with the large French Country house full of antiques, not the new me with the small condo with Mid Century Modern furnishings, informal and colorful environment and handmade accessories.

When I was building the site I saw the damask background and fell in love. I didn't take the time to look around and see what else was out there, I was so excited to get started. 

So starting tonight I will be making a major overhaul of  the look of the site. It will have a colorful new background,  updated title, font and color changes and an updated avatar (the little picture in my profile) and favicon (the little cat pink and black picture instead of the orange B for Blogger). I don't think there is necessarily a good time to make the changes, it just has to be done, and I have less readers over the weekend.

My content will be unchanged and still available throughout these updates, but things might look a little wonky. Please be patient. By late Sunday evening the new look will be complete.

I hope you will like the changes and still hang out with me once they have been made.

Photography Tips and Tricks


Since starting my blog I've been taking many more indoor photos than in the past. Unfortunately they haven't been turning out as nice as I would like. I see much advice in blogland about not using a flash to take your pictures. Most of my crafts and blog writing takes place at night. I don't have enough ambient light to not use a flash. I take great pictures outdoors but inside is a different ball game. I did some research and talked with my son the photographer and here is what I found:

Natural light produces an overall soft effect.

Using a flash creates shadow. Avoid the flash if at all possible. A low contrast picture (dim room, no flash) is preferable to high contrast (dim room, flash). For those really technical people you would want to increase the ISO setting with no flash. But if you know what that is you probably already do it.


Avoid taking a picture with flash in front of or next to any shiny, reflective surface (windows, mirrors, glass, highly polished surfaces). It will create "hot spots", those white blotches. Picture from www.family-photo.com

If you have to take a picture in front of a shiny, reflective surface position yourself at least a 30 degree angle from the surface to avoid the reflection bouncing back to the camera.

Position yourself directly in front of the primary object you are taking a picture of to minimize shadow. This seems obvious. I think what it means is take the picture head on. If you take it from the side, the front of the object will be in shadow.

Being closer than 5 feet in front of a wall will create shadows. My best pictures are taken on my dining room table away from walls.

If you have to be in front of a wall, position yourself and the the object in a straight line which is at a 90 degree angle from the wall.

Use a Tripod. You'll take many more in focus pictures. 

If you use a high enough ISO to not use a flash, the shutter speed will be much too slow to be hand held so use a tripod. What the heck does this mean? I don't adjust ISO settings. Well you actually might. My digital camera has little pictures on the turny knobby thing where I can adjust to daylight, candle light, nighttime, indoor, outdoor snow, manual and automatic settings. These different settings automatically adjust the ISO and white balance (cool or warm colored light) for those general conditions. 

We're not going to talk about adjusting your white balance for cool or warm light. Again, if you know what that is you know how to do it.

Actually use the turny knobby thing to adjust for dim lighting settings while indoor. I always forget to change from automatic which wants to use a flash.

Light from behind an object turns the object into a silhouette.

Light from the side of an object lights the close side and puts the far side in shadow.

With side lighting a white reflective surface (like poster board) will bounce light back to the shadow side and produce depth to your picture. 

The best way to get good lighting indoor is to use a three point approach. Have your primary source of light  at a 45 degree angle to the object; have a reflective surface (like white cardboard) directly across from the light to bounce light back onto the surface and reduce side shadow; and have a light directly behind the object but at a slight angle so it isn't shining directly into the camera.  I use a similar set up when taking pictures for ebay using several desk lamps with a sheet draped over them to soften any harshness. Why I never thought to pull all the equipment out and give it a go for my blog pictures, I don't know! Granted this has limited application for room size decorating pictures! But the general theory of multiple light sources still works.

With all this said and done, for me my best and easiest pictures with no flash indoor are on my dining room table. I have a ceiling light fixture with a defuser which bounces light off the ceiling and provides nice soft light. 

Did this help you at all? I know I picked up some good information.

Thursday, February 18, 2010

I've Been Featured!

Exciting News! I've been featured on Finesse Your Nest as a Newbie Blogger. I'm so honored that Kendall enjoyed my blog and wanted to feature me.

By the way, her site is great, so go over, check out her stuff and say Hi. She also has a blog party every Sunday called Shop The House.  Link up and join the fun. Have a ball checking out what everyone else is doing.

Thanks again Kendall!


Wednesday, February 17, 2010

Round Up of Decorative Frames

I love the look of decorated picture frames. Since I'm going to install either a shelf or picture ledge in my living room and showcase photos, I've been obsessing about interesting and thrifty frame options. The other day I showed you how to make a frame using glass stones from the Dollar Store and one from old CD cases. Here are a few more options:

 These are from Better Homes and Gardens

A frame with buttons hot glued on.


Vintage serving pieces used to frame heritage photos. Looks like I might need to take a trip to the thrift store! (Who am I kidding? I'm there weekly anyway.)

 Black and white photos glued to the front of interesting looking books. This would be good if you need to fill in a lot of space.


Ohhh... I really like this one! How colorful and easy to coordinate (or accent) your room. Use paint chips, cut off the white bits, glue to your mat board. For this to be successful, use a very plain frame.


This is similar to using the vintage serving pieces. Use decorative plates with double stick tape to adhere the photo. I see so many cute orphan plates at the thrift store. I want to purchase them but never know what to do with them. Now I know! 

I'd also like this idea in the kitchen or dining room. Blow up a recipe card (I have my Grandmothers, Great Aunts and Mother's handwritten recipes) and use small plates to frame them out. I'd feel like I was cooking with them in the room with me.


These are from Martha Stewart (when I grow up I want to be just like Martha ... except for that prison thing of course).

She adds labels to the picture frame. I know I've seen those label things in the scrapbook aisle at the craft store. I would add labels like "Alex, age 3", "1998" or "Virginia Smith". I'm definitely going to do this. I have several pieces on display my teenage son created in art school (he's very talented). I will put the title of the piece and the year on the label.


These frames are decorated with beans. Check the grocery store, there are many attractive (and cheap) beans you could use for this project. Just hot glue them in place.


Have two pieces of glass cut and the edges ground smooth. Sandwich your photo or object between the glass and hold closed with binder clips. This has a modern or industrial look to it.


Cover the mat board with pretty fabric. Here she used neutral fabrics. I see it with bold graphics and colors. What a neat way to use up some fabric scraps you've been holding onto. Use hot glue to glue the corners down on the back side.

With all of these projects, don't use your only copy of a picture.  You can easily have digital copies made in minutes at drug stores,  Target, Walmart or photo stores (you can't copy copyrighted material) for only a few bucks. Using these decorative frames are not archival safe and you don't want to have your only copy of Great Aunt Lucy hot glued to the front of a book for all posterity. 

Did you make any of these projects? Send me a picture so I can show it off!

Tuesday, February 16, 2010

It's Craft Time! - CD Case Cube Frame


This is a fun way to display artwork, photos, 3D art or whatever strikes your fancy using only 4 clear CD cases. You can display items 4.5" tall x 5.25" wide by .25" deep. Think scrapbook pages with all the little do-dads! 

What you need: 4 CD cases (make sure they have no cracks and minimal scratches), 4 pictures and possibly a little tape. I also used some window cleaner as my cases were kind of grungy and smudgy looking. For me the project was free, since I have a bunch of CD's yet to be transferred to my computer. If you don't have any cases, you can always try Freecycle or purchase jewel cases at an office supply store. 

This project is a little fiddly. Just go slowly and gently. You don't want to snap the little hinges off the cases. But if you do, just grab another case. I made a couple of these and found one case that was to "loose" and wouldn't hold together with another case. I just swapped it out. I tried to take pictures for those visual learners among us. It is difficult to take a picture of a clear item, so some pictures have the CD art in them to help distinguish front from back.

Open the CD case, remove the CD, paper cover and back and the plastic piece that holds the CD. It will come out if you gently pry it up. I found starting in the middle, getting my nubby fingernails under it and working my way to the corners helpful. It will just pop out. Put your CD away, keep the case and discard the rest. Clean the inside of the case.

Open the case flat and notice the little inside ledges on each piece. There is also a distinctive front and back piece, see how they are different? The little ledges face each other when the case is closed. Open and close the case and see how the pieces fit together. This will help you when you put it back together.

OK, here is a tricky part. Take the front and back pieces apart by gently lifting in the connecting corner and sliding them apart. There are little plastic hinges. Flip one side over. If they are laying flat the little ledges are facing in opposite directions. Put them back together that way (ledges opposite). Form a 90 degree angle.

Do the last step to all 4 cases.

Place the item you want to display in a piece with the bigger ledge, facing out toward you. Since my picture was thin I used a small piece of tape on the back to hold it in place. You might have to play with the placement so it looks OK when the pieces are put together. (I had to move mine over so it wasn't stuck in the hing part of the case).

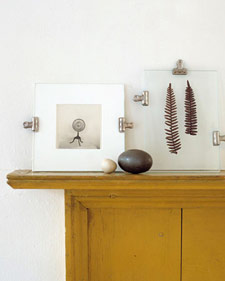
From two 90 degree pieces, connect a front and back CD piece to each other to hold the art in. OK this can be confusing. Look at two 90 degree pieces and think about how a CD case normally closes. You have a front and a back piece and both little ledge pieces face each other. Put your pieces together the same way, just as if you are closing a CD case over your art. You will have a 3 sided box.

Continue with the other  90 degree pieces, mounting your art, putting a front and back piece together and "closing" the CD case to hold the art in. Remember you are making a cube, so you may have to adjust the angle of pieces to fit.

The last piece is done the same way. However it may look different. The one little ledge piece is facing inside the cube. You have to gently place the 4th piece so the front and back are both inside and outside the finished cube. Just look at it and line up the little front and back case ledges so they face each other and close the case.

You are done! Take a deep breath and congratulate yourself! Use a little window cleaner and wipe your fingerprints off. A word of advice: don't try this at 10:00 pm when you are tired. By the way, the pictures I used are Romero Britto's work.


Did you try this project? If so, send me a picture so I can show it off!